This has been the most requested topic ever since I started working on Nuxflare.
What are Cloudflare Durable Objects? How can we leverage them with Nuxt?
Durable Objects are powerful and surprisingly affordable, but they can also seem a bit mysterious at first. I thought I'd break them down in a series of posts explaining how to get the most out of them.
Here's a preview of what we're going to build:
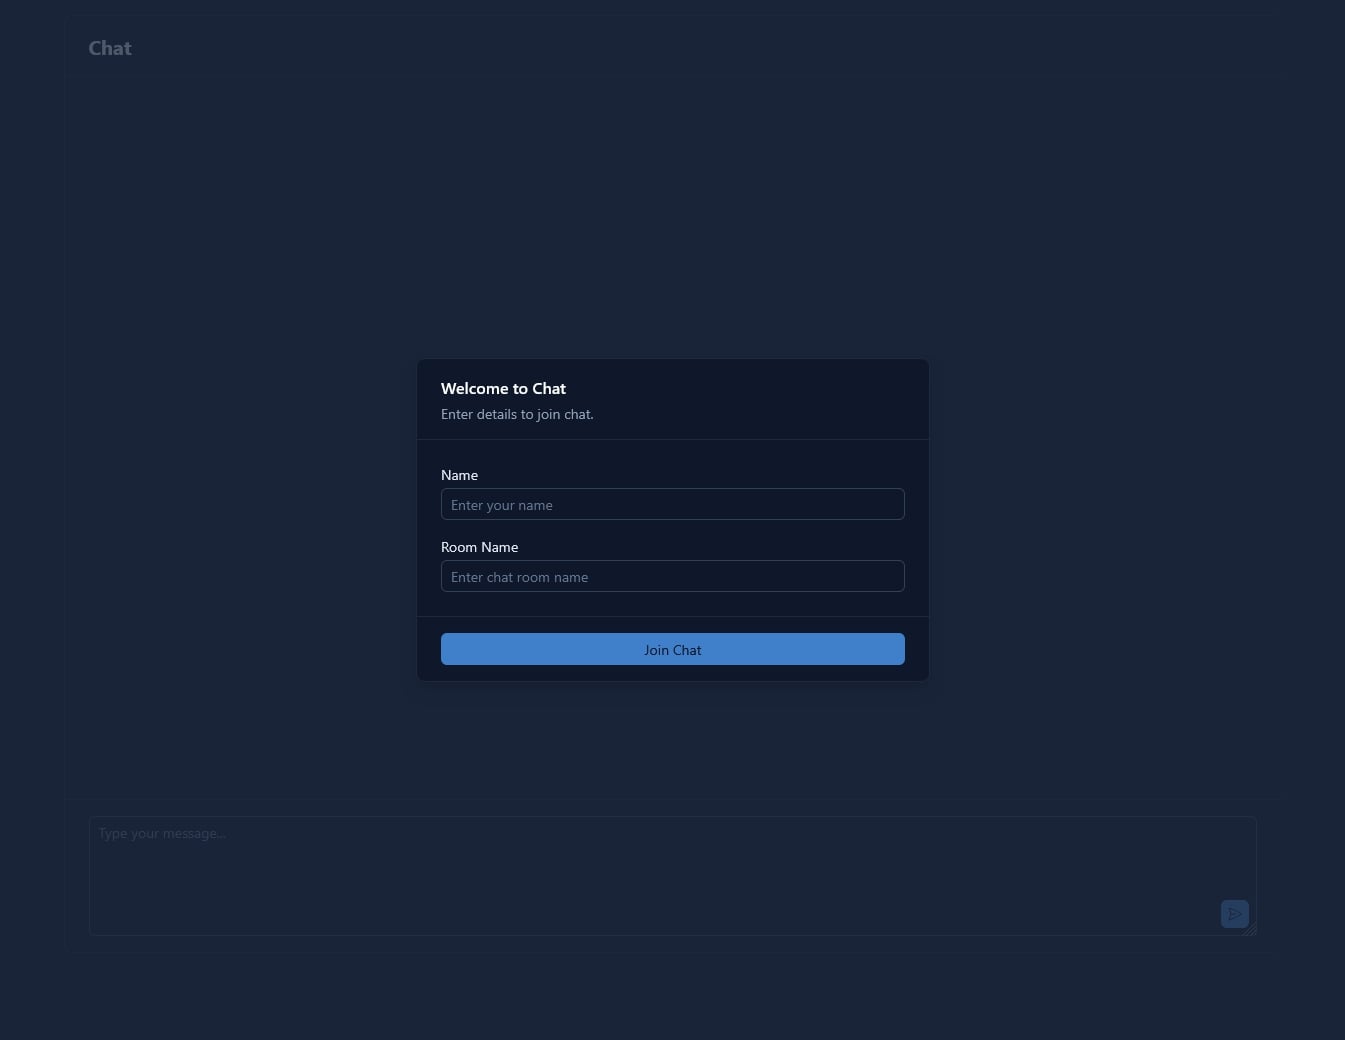
Try it out live: https://websockets-demo.nuxflare.com
Check out the GitHub repo: https://github.com/nuxflare/durable-websockets
Let's get started
I'm using Bun for its cool DX, but you can follow along with npm, pnpm, or yarn—whatever you're most comfortable with.
First, let's create a new Nuxt project:
bunx nuxi@latest init durable-websockets -t v4-compat
We're using Nuxt 4 compatibility mode, which allows us to use the Nuxt 4 project structure, getting ready for it when it releases.
Now, let's install the dependencies:
bunx nuxi@latest module add ui vueuse # Nuxt UI v3, @vueuse/core
bun i -D nuxflare @cloudflare/workers-types
We'll use Nuxflare to deploy two things to Cloudflare:
- The main Nuxt app to Cloudflare Workers.
- The WebSockets server with Durable Objects.
While you can follow this tutorial without Nuxflare, there's really no reason not to use it. Even if you're comfortable writing wrangler.toml configuration yourself, Nuxflare makes it easy to create and destroy resources and deploy to multiple environments. You still retain full control to customize your Wrangler configuration however you want.
Setting up Nuxflare
Let's initialize Nuxflare:
bun nuxflare init
Nuxflare will ask you several questions about your project name, custom domains (for dev and prod deployments), and GitHub Actions setup. Everything is optional.
I'm using websockets-demo.nuxflare.com as the production domain and leaving the development domain empty to use the default Cloudflare Workers subdomain.
For GitHub Actions, I'm using the "Production deployments only" preset, which means code updates to the main branch in the nuxflare/durable-websockets repository will automatically deploy to websockets-demo.nuxflare.com.
The Nuxflare CLI will also prompt you to create and configure a CLOUDFLARE_API_TOKEN for deploying resources to Cloudflare.
Once complete, Nuxflare will install development dependencies like sst (SST.dev) and wrangler, which are needed to manage Cloudflare resources. You'll also notice a new folder called nuxflare and a file called sst.config.ts.
Feeling overwhelmed? Don't worry about it. For the most part, you can completely ignore the nuxflare folder—it's where all the infrastructure-as-code "wizardry" happens. Just commit everything to source control.
Configuring the Infrastructure
Now let's configure the infrastructure for our app by updating the run() function inside sst.config.ts:
async run() {
  const { Nuxt } = await import("./nuxflare/nuxt");
  const { Worker } = await import("./nuxflare/worker");

  const domain =
    $app.stage === "production"
      ? prodDomain || undefined
      : devDomain
        ? `${$app.stage}.${devDomain}`
        : undefined;

  // Create WebSockets worker
  const { websocketsUrl } = await Worker({
    name: "WebSockets",
    dir: "./websockets",
    main: "index.ts",
    durableObjects: [{ className: "WebSockets", bindingName: "WEBSOCKETS" }],
  });
  // Create Nuxt app and pass the WebSockets URL
  Nuxt("App", {
    dir: ".",
    domain,
    outputDir: ".output",
    extraVars: {
      NUXT_PUBLIC_WEBSOCKETS_URL: websocketsUrl,
    },
  });
}
As mentioned, we're creating two components:
- The WebSockets server with Durable Objects.
- The Nuxt app that connects to the WebSockets server.
For the Nuxt app, we specify dir: ".", and Nuxflare will build and deploy it with Cloudflare Workers. For the WebSockets server, we specify a websockets directory with index.ts as the worker entrypoint.
Understanding Durable Objects
So, what's the deal with Durable Objects?
A Durable Object is essentially a class. You can create multiple instances of it, and each instance manages its own state and handles its own WebSocket connections.
What makes Durable Objects special is that they're automatically placed close to the user. For example, in our chat app, when a user creates a new room, it creates a new Durable Object instance on a Cloudflare server closest to that user. When others join the same chat room (from anywhere in the world), they connect to that same Durable Object instance.
This is powerful because you can focus on writing your real-time logic without worrying about server deployment, while users still get the best possible latency.
Note: A Durable Object—at least for now—doesn't relocate once created. If the first user who creates a Durable Object instance is geographically distant from later users, those users might experience suboptimal latency. This limitation is difficult to solve with alternative approaches too.
So yeah, a Durable Object is a class, and we're calling ours "WebSockets". But what's a binding name?
Cloudflare has this thing: everything that gets used through a Worker has to go through a "binding"—whether it's KV, D1, Queues, or Durable Objects. For each feature, you need a binding name.
We're saying: if any Worker needs to use the "WebSockets" Durable Object, it should do so through a binding called "WEBSOCKETS" (env.WEBSOCKETS).
Creating our Durable Objects Class
Now that we understand the basics, let's write our Durable Objects class:
export class WebSockets extends DurableObject {}
Our Durable Object needs to:
- Handle WebSocket connection requests (when a Worker identifies a Durable Object instance that should handle a WebSocket connection).
- Process incoming WebSocket messages (when a user sends a message in the chat).
- Handle when a WebSocket connection closes (cleaning up state for that connection).
- Expose a
publishfunction to broadcast messages to specific users connected via WebSockets.
Handling WebSocket Requests
For #1, let's write a fetch function. We'll receive the full request object from the Worker. From there, we should check if it's a WebSockets request, and if it is, we create a WebSockets pair. A WebSocket pair is like walkie-talkies: for each client that opens a WebSockets connection with the server, the server keeps one node and gives the other to the client. Then we can use the node on the server to send and receive messages.
export class WebSockets extends DurableObject {
  override async fetch(request: Request): Promise<Response> {
    if (request.headers.get("upgrade") === "websocket") {
      try {
        const { room, userId } = extractRoomAndUser(request);
        const protocols =
          request.headers
            .get("sec-websocket-protocol")
            ?.split(",")
            .map((x) => x.trim()) || [];
        protocols.shift(); // remove the room:userId from protocols

        const webSocketPair = new WebSocketPair();
        const [client, server] = Object.values(webSocketPair);
        if (server) {
          server.serializeAttachment({
            room,
            userId,
          });
          this.ctx.acceptWebSocket(server, [room, userId]);
        }

        const res = new Response(null, { status: 101, webSocket: client });
        if (protocols.length > 0) {
          res.headers.set("sec-websocket-protocol", protocols[0] as string);
        }
        return res;
      } catch (err) {
        console.error("Error in websocket fetch:", err);
        return new Response(null, { status: 400 });
      }
    }
    return new Response(null);
  }
}
There are still a few more things to unpack. Let's go one by one.
Authentication with the WebSocket Protocols Header
Let's talk about the WebSocket protocols header hack we're using for authentication.
WebSockets don't natively support passing authentication data in the initial handshake like HTTP headers. However, there's a workaround: the WebSocket protocol header can include custom protocols as comma-separated values.
We're encoding our room and user ID in base64 and passing it as the first protocol. The server extracts this information to determine which room the user wants to join and to identify them in the chat.
// NOTE: in a real-world scenario, the token should instead be JWT or similar
// from which we could extract and validate room/user/topic and such
// or, the info can even be stored inside a KV
function extractRoomAndUser(request: Request): {
  room: string;
  userId: string;
} {
  const protocolHeader = request.headers.get("sec-websocket-protocol");
  if (!protocolHeader) {
    throw new Error("Missing sec-websocket-protocol header");
  }
  const [encoded] = protocolHeader.split(",").map((x) => x.trim());
  if (!encoded) {
    throw new Error("Invalid sec-websocket-protocol format");
  }
  const decoded = Buffer.from(encoded, "base64").toString("utf-8");
  const [room, userId] = decoded.split(":");
  if (!room || !userId) {
    throw new Error("Room and User ID must be separated by a colon");
  }
  return { room, userId };
}
Read this Stack Overflow post for more info about WebSocket authentication.
For the purposes of this tutorial, we are doing no "validation" on the server to make sure the user is who they say they are. This won't work in production where we should probably use a JWT token or similar that can be verified on the server.
WebSocket Hibernation and Serialize/Deserialize Attachment
With Durable Objects, you pay for the time they're active.
This can get expensive with WebSockets because if users are connected to a chat room but not actively chatting, the Durable Object sits idle, costing you money while it maintains the WebSocket connection state.
Thankfully, Cloudflare offers WebSocket Hibernation. This means if a Durable Object has active WebSocket connections but isn't processing messages, it can "hibernate," and you won't pay for the inactive time. The WebSocket connection with the client remains open, and if there's activity, the Durable Object is "revived" to handle it.
Durable Objects let you store a small amount of state (2KB) for each WebSocket that gets restored when it comes back online. This should contain minimal information to identify the client. For storing more info, you should use the Durable Objects Storage API, which lets you use a full-fledged KV store for persistence.
Handling WebSocket Events
For handling WebSocket messages:
- We first identify the client based on the object we attach to each client.
- We support two types of incoming messages: one where a user announces (or changes) their name, and another where the user can send chat messages.
export class WebSockets extends DurableObject {
  // ...
  override async webSocketMessage(
    ws: WebSocket,
    message: ArrayBuffer | string,
  ) {
    const { room, userId } = ws.deserializeAttachment();
    // Validate message type and size
    // [...]
    try {
      const parsed = JSON.parse(message) as WebSocketMessage;
      if (parsed.type === "chat") {
        if (
          typeof parsed.text !== "string" ||
          parsed.text.trim().length === 0
        ) {
          throw new Error("Invalid chat message");
        }
        const userName =
          (await this.ctx.storage.get<string>(`name:${userId}`)) || userId;
        this.publish(room, {
          type: "chat",
          userId,
          userName,
          text: parsed.text,
          time: new Date().toISOString(),
        });
      } else if (parsed.type === "name") {
        if (
          typeof parsed.name !== "string" ||
          parsed.name.trim().length === 0
        ) {
          throw new Error("Invalid name");
        }
        await this.ctx.storage.put(`name:${userId}`, parsed.name.trim());
        this.publish(room, {
          type: "name",
          userId,
          name: parsed.name.trim(),
          time: new Date().toISOString(),
        });
      } else {
        throw new Error("Unknown message type");
      }
    } catch (err) {
      console.error("Message processing error:", err);
      ws.close(1003, "Invalid message format");
    }
  }
  override async webSocketClose(
    ws: WebSocket,
    code: number,
    reason: string,
    _wasClean: boolean,
  ) {
    const { userId } = ws.deserializeAttachment();
    await this.ctx.storage.delete(`name:${userId}`);
    ws.close(code, reason);
  }
}
I'm using the Durable Objects Storage API for storing the user name with await this.ctx.storage.put and await this.ctx.storage.get.
When a WebSocket connection is closed, we clear the KV for that user.
The Publish Function
To send messages to the users connected to the room, we are using the publish function.
We loop through all the WebSockets connected to our Durable Object instance and send them the message payload.
export class WebSockets extends DurableObject {
  async publish(room: string, data: any) {
    try {
      const websockets = this.ctx.getWebSockets();
      if (websockets.length < 1) {
        return;
      }
      for (const ws of websockets) {
        const state = ws.deserializeAttachment() || {};
        if (state.room === room) {
          ws.send(JSON.stringify(data));
        }
      }
      return null;
    } catch (err) {
      console.error("publish err", err);
    }
  }
}
Note: The room check here is redundant because we are anyway creating a Durable Object instance for each room. But the redundancy is intentional in case we later change the logic for creating Durable Object instances.
Writing our Worker
Now that our Durable Objects are ready to manage state and handle WebSocket connections, let's write the Cloudflare Workers code that uses these Durable Objects:
export default class Worker extends WorkerEntrypoint {
  override async fetch(request: Request) {
    const binding = (this.env as any)
      .WEBSOCKETS as DurableObjectNamespace<WebSockets>;
    try {
      const { room } = extractRoomAndUser(request);
      const stub = binding.get(binding.idFromName(room)); // infer durable object instance from room name
      return stub.fetch(request);
    } catch (err) {
      console.error("Error in worker fetch:", err);
      return new Response(null, { status: 400 });
    }
  }
  async publish(room: string, data: any) {
    const binding = (this.env as any)
      .WEBSOCKETS as DurableObjectNamespace<WebSockets>;
    const stub = binding.get(binding.idFromName(room)); // infer durable object instance from room name
    await stub.publish(room, data);
    return new Response(null);
  }
}
We are using WEBSOCKETS as the binding name to find the Durable Objects class.
Durable Objects don't have a create method to create an instance. So we just use get. A Durable Object gets created on the go, if it's accessed for the first time.
The idFromName function takes a string to generate an ID for the instance such that it will generate the same ID for the same string (and different IDs for different strings). Like we wanted, we use the room name to uniquely identify the Durable Objects.
We also expose a publish method for the worker that passes things off to the this.publish method in the Durable Object. This is useful because we can then call this method from some other worker with a service binding, and this will give us a way to send impromptu "server" messages to users.
Writing the Frontend with useWebSocket
In the repository, we have a basic chat UI using Nuxt UI v3 and Tailwind. The important part is in the Messages.vue component where we connect to the WebSockets server:
const protocol = btoa(`${chatRoom}:${currentUser.id}`);
const { send } = useWebSocket(useRuntimeConfig().public.websocketsUrl, {
  protocols: [protocol.replaceAll("=", ""), "chat"],
  onConnected: () => {
    send(
      JSON.stringify({
        type: "name",
        name: currentUser.name,
      }),
    );
  },
  onMessage: (_ws, event) => {
    const data = JSON.parse(event.data);
    if (data.type === "chat") {
      messages.value.push({
        sender: {
          id: data.userId,
          name: data.userName,
        },
        content: data.text,
        timestamp: data.time,
      });
    }
  },
});
We're using useWebSocket from @vueuse/core because it automatically handles reconnections and heartbeats for us.
For the websocketsUrl, we have our runtimeConfig:
export default defineNuxtConfig({
  // [...]
  runtimeConfig: {
    public: {
      websocketsUrl: "ws://localhost:8787", // default used for dev
    },
  },
});
We specify a default value for development, but we override this when deploying to Cloudflare Workers in the sst.config.ts:
// [...]
Nuxt("App", {
  dir: ".",
  domain,
  outputDir: ".output",
  extraVars: {
    NUXT_PUBLIC_WEBSOCKETS_URL: websocketsUrl,
  },
});
I'm currently working on an update to make development easier for Nuxflare. This will simplify using Durable Objects and service bindings in dev mode. The challenge is that you need a separate workers dev server running for these features. Dev mode for D1, KV, R2, etc., is already supported with
@nuxt-hub/coreandnitro-cloudflare-dev.
Deploying Our Application
To deploy, simply run:
bun nuxflare deploy --stage hello # Use whatever stage you like
You can also completely remove a stage:
bun nuxflare remove --stage hello
And that's it! You now have a real-time chat application running on Cloudflare Workers with Durable Objects and Nuxt. Pretty cool, right?
This only scratches the surface of what you can do with Durable Objects. In future posts, I'll dive deeper into more advanced stuff.
Let me know (X, Discord) if you have any questions or if there's anything specific about Durable Objects you'd like me to cover next!
Before You Go...
Hey, if you've read this far, I'm guessing you found this useful.
I've been working on Nuxflare Pro – it's a complete Nuxt + Cloudflare starter kit that saves you tons of setup time.
- It's a one-time purchase with lifetime access to all future Nuxflare products
- You'll be directly supporting my work to keep building in open-source and create content (like this post)
- You'll get early access to everything I create for the Nuxt and Cloudflare ecosystem
Speaking of which... I'm currently building Nuxflare Landing – an AI coding optimized landing page builder that works seamlessly with Nuxt UI and Nuxt Content. As a Pro member, you'll get it completely free when it launches (soon).
No pressure at all – and thanks for reading either way.